How to Trigger Power BI Refresh from Azure Data Factory

Mate Szenci

In this article, I will show you how to connect Azure Data Factory (ADF) with Power BI to automate report refreshes. This integration keeps your Power BI dashboards up-to-date automatically, saving time and ensuring your data is always current for better decision-making.
Idea & Concept
The main challenge I’ve faced in Power BI is that I need to refresh my data hourly, but the unpredictability of the data refresh schedule can lead to inconsistencies in my reports. If the refresh process for a data source takes longer than expected, a new hourly refresh might start before the previous one finishes. This could cause Power BI to pull some data from the new refresh while the old refresh is still in progress, resulting in a mix of data from different cycles, which causes inconsistencies in the report or even break the report as it can create invalid relationships between tables.
Most organizations rely on ETL (Extract, Transform, Load) or ELT (Extract, Load, Transform) processes to load and process data within their data warehouse systems, ensuring that data is structured and accessible for analysis. In our case, we leverage Azure Data Factory (ADF) as our standard ETL tool. ADF is a powerful and versatile service that offers a wide range of built-in connectors as linked services, enabling integration with various data sources and destinations. Additionally, ADF has the capability to trigger HTTP requests, expanding its utility beyond simple data transfers.
This feature is advantageous when working with Power BI, especially given that Power BI’s online service offers numerous built-in APIs. These APIs can be leveraged to automate tasks such as dataset refreshes. By integrating ADF with Power BI through these APIs, we can synchronize ETL processes with Power BI report refreshes, ensuring that the most up-to-date data is available for analysis as soon as it’s loaded.
For instance, if there is a requirement to refresh datasets hourly, ADF can be configured to initiate the refresh process automatically after each data load operation. This not only optimizes the workflow but also guarantees that reports are consistently updated with the latest data, enhancing the accuracy and timeliness of insights. In the following example, we will demonstrate how to configure ADF to load data on a daily schedule and subsequently trigger a Power BI report refresh (in the case study we use a Power BI Dataflow which supplies data to a Power BI Semantic Modell), ensuring that your reports are always up to date with the latest data.
In terms of pricing, we must pay for the Azure Key Vault and for the Azure Data Factory. These are depending on your configuration and usage. You can find their pricing here: Azure Data Factory, Azure Key Vault.
In this solution, we will rely on Microsoft’s trusted network for connectivity and will not configure a virtual network. However, we recommend using a virtual network across the entire solution to enhance security, provide better control over network traffic, and protect your resources more effectively.
Prerequisites
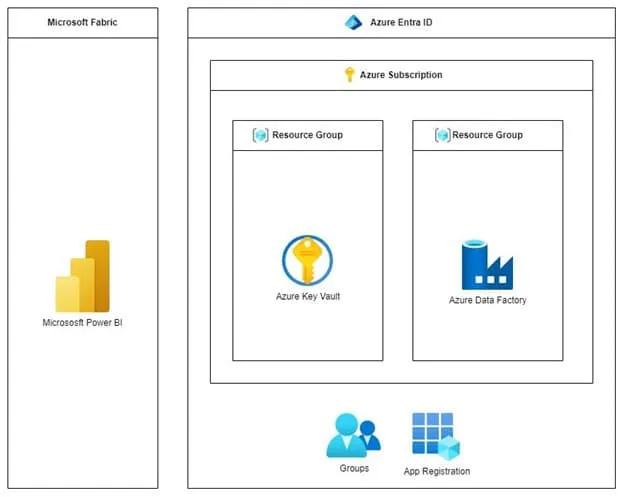
To implement the integration between Azure Data Factory (ADF) and Power BI several configurations are required. These steps will ensure secure access, manage permissions, and enable the necessary APIs to support the workflow.
- App Registration in Azure Entra ID (formerly known as Azure Active Directory or AAD)
This registered application will serve as the identity for the process, enabling secure communication between ADF and Power BI.
- Generate a client secret for the App Registration. This secret will be used for authentication when making API calls to Power BI services.
- Assign the appropriate API permissions to the App Registration. Specifically, grant permissions to access Power BI online services, allowing the application to manage datasets refreshes.
- Security Group in Azure Entra ID
This group will be used to control and restrict access to the Fabric API, ensuring that only authorized users and applications can interact with Power BI resources.
- Add the App Registration to this security group. This step is crucial for enforcing security policies and limiting API access.
- Azure Key Vault
An Azure Key Vault is required to securely store sensitive information, such as the client secret created in the App Registration process.
- Upload the client certificate to the Azure Key Vault. This ensures that the client secret is securely stored and can be retrieved by ADF during the execution of ETL processes.
- Enable Fabric APIs in Power BI Admin Portal
Finally, Fabric APIs must be enabled in the Power BI Admin Portal. This is a crucial step as it allows the registered application to interact with Power BI, including the ability to trigger dataset refreshes.
- Fabric Administrator permission is required to enable these APIs in the Power BI Admin Portal. This involves granting the necessary permissions and configuring the environment to support API interactions.
Each of these steps requires precise configuration within Azure. The Fabric Administrator plays a vital role, especially in enabling the Fabric APIs within Power BI Admin Portal and ensuring that all settings align with organizational security policies. Throughout the setup, we will specify and configure these services in Azure.
Implement the solution
The first step in integrating Azure Data Factory (ADF) with Power BI is to create an App Registration in Azure Entra ID. This registered application will serve as the identity through which your ADF process can securely interact with Power BI.
Setting up the Environment
Step 1: Create an App Registration
- Navigate to Azure Entra ID (Azure Active Directory):
- Sign in to the Azure portal.
- In the left-hand navigation pane, select “Azure Entra ID” (formerly Azure Active Directory). 2.Create a New App Registration:
- In the Azure Entra ID blade, select “App registrations” from the menu.
- Click on the “New registration” button to start the process. 3.Specify the App Registration Details:
- Name: Enter a name for the application. This name can be changed later, so you can choose something descriptive like “ADF-PowerBI-Integration.”
- Supported Account Types: For this scenario, select “Accounts in this organizational directory only (Single tenant).” This option restricts access to users within your organization’s Azure AD tenant.
- Redirect URI (optional): You can leave this blank for now, as it’s not required for the initial setup. 4. Register the Application:
- Once you have filled in the necessary details, click on the “Register” button to create the App Registration. 5. Default Permissions:
- By default, the App Registration will have some basic permissions. Note that in Azure, every user has the ability to register an application, but the required API permissions and other advanced configurations will need to be set up afterward.

Step 2: Create a Client Secret for Your App Registration
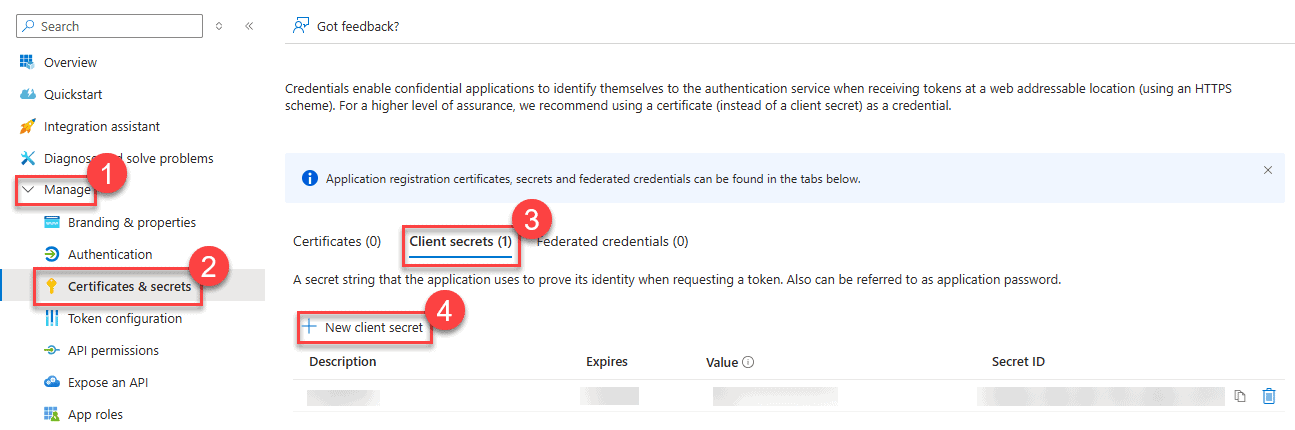
- Navigate to the “Certificates & Secrets” Section:
- In your App Registration, locate the “Manage” section on the left-hand menu.
- Click on “Certificates & secrets” under the “Manage” heading. 2. Select the “Client Secrets” Tab:
- In the main panel, you will see two tabs: “Certificates” and “Client secrets.”
- Ensure that the “Client secrets” tab is selected. 3. Create a New Client Secret:
- Click on the “+ New client secret” button to create a new client secret. This will be the secret key that your application will use to authenticate itself. 4. Configure the Client Secret:
- A panel will open, prompting you to provide a description and an expiration period for the client secret.
- Description: Provide a name or description for the client secret to help you identify it later (e.g., “ADF Integration Key”).
- Expires: Choose the expiration duration for the client secret. Options typically include 6 months, 12 months, or 24 months. Select the duration that suits your security policies.
- Once configured, click on the “Add” button. 5. Save the Client Secret Value:
- After creating the client secret, it will be displayed only once in the “Value” column. Make sure to copy this value and store it securely, as you will not be able to retrieve it again once you leave the page.
- You will use this client secret value later when configuring your Azure Data Factory to authenticate with Power BI.
With the client secret created, the next steps will involve storing it securely in Azure Key Vault and assigning the necessary API permissions for Power BI.
Step 3: Assign Delegated Permissions for Power BI Dataset and Dataflow Refresh
Delegated permissions allow your application to act on behalf of a signed-in user, meaning the app will perform actions based on the user’s privileges. This is useful when the application needs to perform tasks within the context of a user’s session.
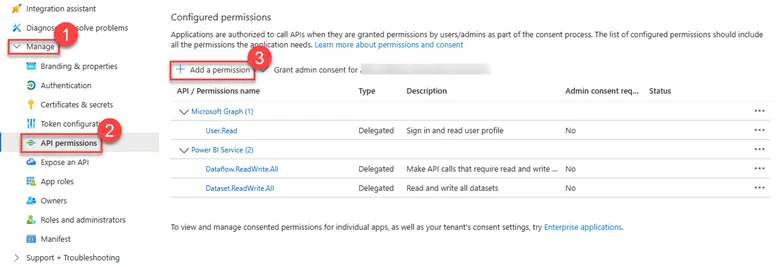
3.1. Navigate to API Permissions
- After configuring your client secret, go back to the App Registration overview page in the Azure portal.
- In the left-hand menu under the “Manage” section, select API permissions.
3.2. Add Power BI API Permissions
- On the API permissions page, click the + Add a permission button.
- In the “Request API permissions” pane, select Power BI Service.
3.3. Choose Delegated Permissions
- In the Power BI Service section, choose Delegated Permissions.
- From the list of available permissions, select the following:
- Dataset.ReadWrite.All: This permission allows the signed-in user to read and write all datasets, including the ability to refresh datasets.
- Dataflow.ReadWrite.All: This permission allows the signed-in user to read and write all dataflows, including the ability to refresh dataflows.
- After selecting these permissions, click the Add permissions button.
Scope of Permissions: The app will only be able to act within the scope of the permissions granted to the user. If a user does not have permissions to refresh certain datasets or dataflows, the app won’t be able to perform those actions.
It’s important to note that the ReadWrite.All permission is only effective in workspaces where the security group has been added as a member. Attempting to access datasets in workspaces outside of this scope will result in an error, such as: {“error”:{“code”:”ItemNotFound”,”message”:”Dataset XY is not found! Please verify the datasetId is correct and that the user has sufficient permissions.”}}
Step 4: Create a Security Group and Add the App Registration as a Member
To further secure your application and manage access to Power BI resources, you can create a Security Group in Azure Entra ID (formerly Azure Active Directory) and add the App Registration as a member. This step helps you control and restrict access to the Power BI APIs and resources more effectively.
4.1. Create a Security Group in Azure Entra ID
- Navigate to Azure Entra ID:
- In the Azure portal, go to Azure Entra ID from the left-hand menu.
- Create a New Security Group:
- In the Azure Entra ID blade, select Groups from the menu on the left.
- Click on the + New group button to create a new security group.
- Configure the Security Group:
- Group Type: Select Security as the group type.
- Group Name: Enter a name for the security group, such as “PowerBI-ADF-Access”.
- Group Description: Optionally, provide a description for the group, such as “Security group for ADF to access Power BI”.
- Membership Type: Leave this as “Assigned” to manually add members.
- Create the Group:
- Once all the details are filled in, click on the Create button to create the security group.
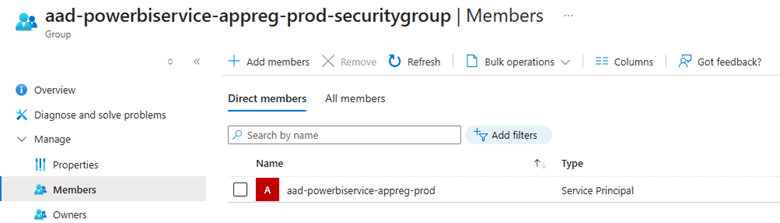
4.2. Add the App Registration as a Member
- Locate the Newly Created Security Group:
- After the group is created, it will appear in the list of groups. Click on the group name to open its settings.
- Add Members to the Security Group:
- In the group settings, go to the Members tab.
- Click on + Add members to open the member selection pane.
- Select the App Registration:
- In the “Add members” pane, search for the App Registration name you created earlier (e.g., “ADF-PowerBI-Integration”).
- Select the App Registration from the search results and click Select.
- Confirm Membership:
- The selected App Registration should now appear in the members list of the security group.
- Confirm that the App Registration has been added as a member.
Step 5: Create an Azure Key Vault and Store the Client Secret
To securely store sensitive information like the client secret generated during your App Registration, you should use Azure Key Vault. This ensures that your secrets are stored in a secure, centralized location and can be accessed safely by authorized applications.
5.1. Create an Azure Key Vault
- Navigate to the Azure Portal:
- Sign in to the Azure portal and use the search bar to find “Key Vaults.”
- Click on “Key Vaults” in the search results.
- Create a New Key Vault:
- In the Key Vaults pane, click on the + Create button.
- You will be guided through the process to set up your new Key Vault.
- Configure the Key Vault:
- Subscription: Select the subscription in which you want to create the Key Vault.
- Resource Group: Choose an existing resource group or create a new one.
- Key Vault Name: Provide a globally unique name for your Key Vault (e.g., “kv-powerbiappreg-prod”).
- Region: Select the region where you want the Key Vault to be hosted.
- Pricing Tier: Choose the standard pricing tier unless you require premium features.
- Review and Create:
- After filling in all the required fields, click on the Review + create button.
- Review your configurations, and if everything is correct, click on Create to deploy your Key Vault.
5.2. Store the Client Secret in Azure Key Vault
- Navigate to the Newly Created Key Vault:
- Once the Key Vault is deployed, navigate to it from the Key Vaults section in the Azure portal.
- Add a New Secret:
- In the Key Vault’s left-hand menu, select Secrets under the “Settings” section.
- Click on the + Generate/Import button to create a new secret.
- Configure the Secret:
- Upload Options: Select “Manual” to manually enter the secret value.
- Name: Enter a name for the secret (e.g., “ADF-PowerBI-ClientSecret”).
- Value: Paste the client secret value you copied when you created it during the App Registration setup.
- Content Type: Optionally, you can enter a content type like “Client Secret.”
- Activation and Expiration: You can optionally set activation and expiration dates for the secret.
- Create the Secret:
- After configuring all the necessary fields, click on the Create button to store the client secret in Azure Key Vault.
5.3. Accessing the Secret in Your Application
- Grant Access to the Key Vault:
- You will need to grant your Azure Data Factory (or any other application that will use the secret) access to this Key Vault. This is typically done by assigning appropriate roles or setup access policies to the service principal (App Registration) or the ADF managed identity.
- If you use RBAC (Role Based Access Control) then assign the Key Vault Certificate User permission to the Azure Data Factory.
- If you want to use the Access Policies, then give List and Get access for the Azure Data Factory. 2. Use the Secret in Azure Data Factory:
- In Azure Data Factory, when setting up linked services or activities that require the client secret, use the Key Vault integration to fetch the secret. This will ensure that the secret is retrieved securely at runtime. 3. Networking settings
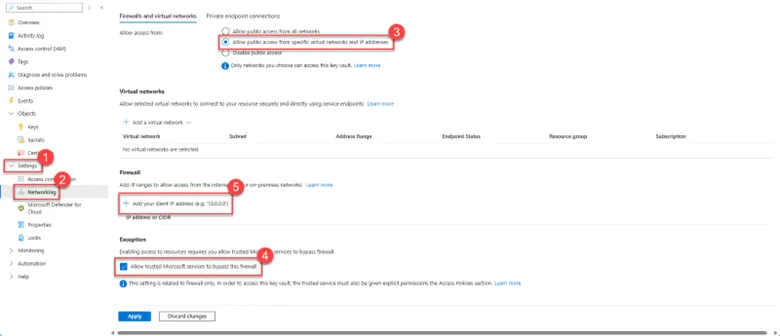
- To enhance the security of your Azure Key Vault, it’s important to configure the networking settings to restrict access. This ensures that only specific networks or trusted services can access the secrets stored in the Key Vault.
- In the Firewalls and virtual networks section, choose the option Allow public access from specific virtual networks and IP. This setting restricts access to the Key Vault from only the specified virtual networks or IP addresses.
- In the Firewall section, you have the option to allow trusted Microsoft services to bypass the firewall. This is typically recommended as it ensures that essential Azure services, like Azure Data Factory, can access the Key Vault even if network restrictions are in place.
- You can also specify individual IP addresses or CIDR ranges that are allowed to access the Key Vault. Click on + Add your client IP address to add the current IP or manually enter an IP address or range. You need to add your client IP address to create or manage a secret.
Step 6: Enable the Fabric API for a Specific Security Group in Power BI Admin Portal and Grant Access to a Specific Workspace
To allow your application to interact with Power BI using the Fabric API, you need to enable this API for a specific security group in the Power BI Admin Portal and grant the necessary access to the desired Power BI workspace.
6.1. Enable the Fabric API for the Security Group
- Access the Power BI Admin Portal:
- Sign in to the Power BI service with an account that has Power BI administrator privileges.
- Navigate to the Power BI Admin Portal by selecting the settings gear icon in the upper right corner and choosing Admin portal. 2.Navigate to Tenant Settings:
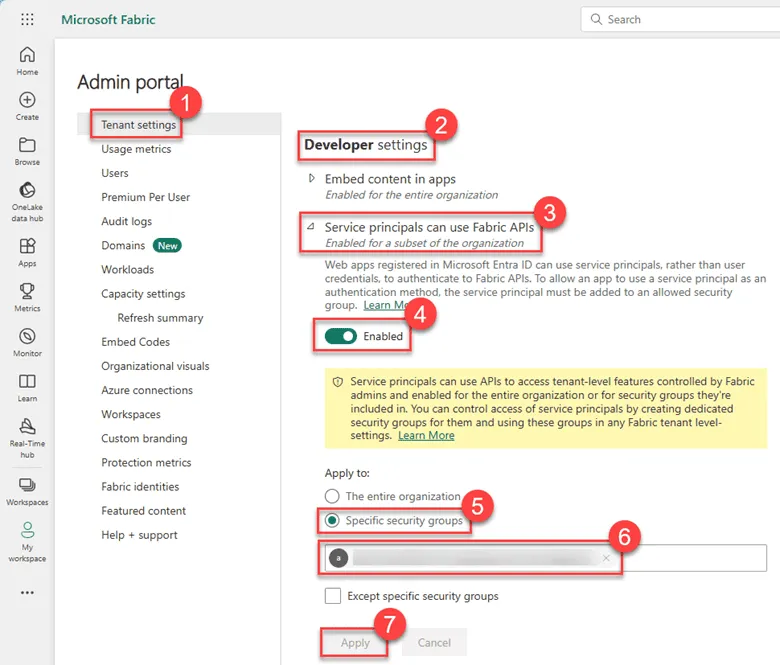
- In the Power BI Admin Portal, find and select Tenant settings from the left-hand menu. 3.Enable the Fabric API:
- Scroll down to the Developer settings section.
- Locate the Power BI service settings for APIs or Fabric API settings (the exact name might vary).
- Expand the section and ensure that the Fabric API is enabled.
- Under Apply to, select Specific security groups.
- In the Select security groups box, add the security group you created earlier (e.g., “PowerBI-ADF-Access”).
- As mentioned earlier, it’s important to specify a security group to grant access exclusively to the application, rather than to the entire organization.
- Click Apply to save your changes.
6.2. Grant Access to a Specific Power BI Workspace
- Navigate to the Power BI Service:
- In the Power BI service, go to the Workspaces section to locate the workspace where the app will need access. 2. Assign Workspace Roles:
- Select the specific workspace and go to the Settings of that workspace.
- Navigate to the Permissions tab within the workspace settings.
- Click on Add members or Add users.
- Search for and add the security group you configured earlier (e.g., “PowerBI-ADF-Access”).
- Assign an appropriate role to the group:
- Member: Allows the group to edit content within the workspace, including refreshing datasets and dataflows. We recommend this option.
- Contributor: Allows the group to publish reports and refresh datasets.
- Admin: Grants full control over the workspace. 3. Save Changes:
- After assigning the appropriate role, click Save to apply the permissions to the workspace.
Creating the Azure Data Factory Pipeline
With all the foundational elements in place, we’re now ready to create the pipeline that will orchestrate our data processes and automate key tasks. Specifically, this pipeline will trigger the refresh of Power BI datasets and dataflows. By leveraging the secure connections and permissions we’ve configured. Keep in my that we need to refresh the dataflow first to refresh the dataset since the dataflow is the predecessor to the dataset.
Step 1: Creating a Linked Service in Azure Data Factory for the Azure Key Vault
Creating a linked service in Azure Data Factory (ADF) allows you to connect ADF to various data sources, including Azure Key Vault, databases, storage accounts, and more. Below is a step-by-step guide for creating a linked service to Azure Key Vault.
- Open Azure Data Factory
- In the Azure portal, navigate to your Azure Data Factory instance.
- Open the Data Factory UI by clicking on Author & Monitor.
- Create a New Linked Service
- In the ADF UI, navigate to the Manage tab on the left-hand menu.
- Under the Connections section, select Linked services.
- Click on the + New button to create a new linked service.
- Choose the Linked Service Type
- In the New Linked Service pane, search for and select Azure Key Vault from the list of available services.
- Click Continue.
- Configure the Linked Service
You will now see the configuration pane for the Azure Key Vault linked service.
- Name:
- Enter a name for your linked service (e.g., AzureKeyVault1). 2.Description:
- Optionally, provide a description to identify the purpose of this linked service. 3. Azure Key Vault Selection Method:
- From Azure subscription: Choose this option if your Key Vault is within your current subscription.
- Enter manually: Select this option if you need to manually enter the Key Vault details (not used in this case). 4. Azure Subscription:
- Select your Azure subscription from the dropdown list.
5.Azure Key Vault Name:
- Choose the Azure Key Vault you created earlier from the dropdown list. 6.Authentication Method:
- System-assigned managed identity: This is the recommended method for authentication as it securely uses the managed identity associated with the Data Factory.
- The Managed identity name and Managed identity object ID will be automatically populated.
- Test the Connection
- Before creating the linked service, it’s a good practice to test the connection.
- Select Test connection to ensure that ADF can successfully connect to the Azure Key Vault.
- Create the Linked Service
- Once the connection test is successful, click on the Create button to finalize and create the linked service.
Step 2: Set Up a Web Activity for Refreshing a Power BI Dataflow in Azure Data Factory
To automate the refresh of a Power BI dataflow using Azure Data Factory, you can use a Web Activity. The following guide will walk you through setting up the Web Activity to trigger a Power BI dataflow refresh.
- Access the Pipeline Editor
- Navigate to Azure Data Factory:
- Open your Azure Data Factory instance in the Azure portal.
- Go to Author > Pipelines > + New pipeline to create a new pipeline or select an existing pipeline.
- Add a Web Activity:
- In the Activities pane, expand the General section.
- Drag and drop the Web activity onto the pipeline canvas.
- Navigate to Azure Data Factory:
- Configure the Web Activity
Here’s how you can configure the Web Activity to refresh your Power BI dataflow:
1.Set the Basic Properties:
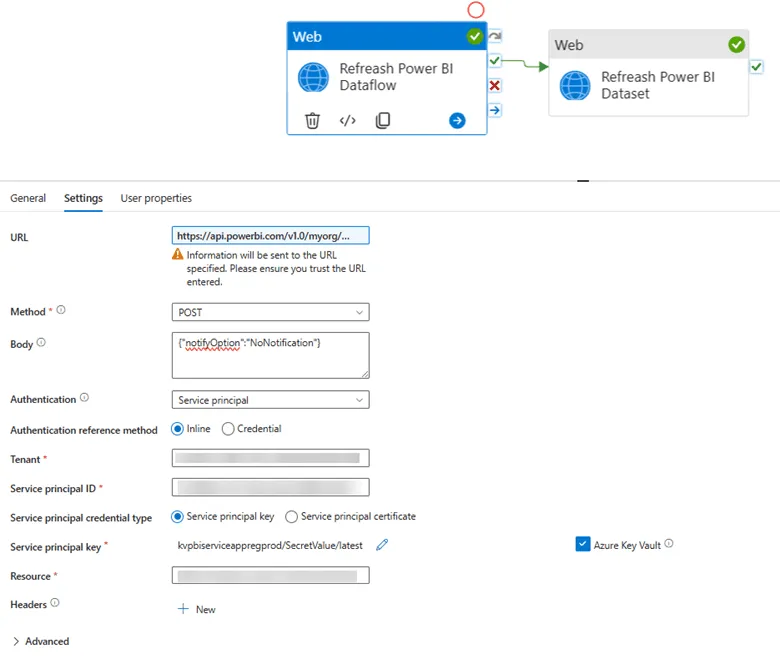
- Name: Set the name of the activity to something descriptive, such as Refresh Power BI Dataflow.2.Settings Tab:
- URL:
- Enter the URL to trigger the dataflow refresh.
- Use the expression format to ensure the URL is dynamic if needed: https://api.powerbi.com/v1.0/myorg/groups/{GroupID}/dataflows/{DataflowID}/refreshes.
- Replace {GroupID} with {YourGroupId} and {DataflowID} with {YourDataflowID}. (The Group ID corresponds to the Workspace ID, which you can find in the URL of the Power BI Service when you open your specific workspace).
Group ID Example: https://app.powerbi.com/groups/89d2f27a-a923-44c2-8f1f-8fdebd865c9e/list?experience=power-bi)
- Method:
- Set the method to POST since you are sending a request to initiate a refresh.
- Body:
- Set the body to the following JSON to not receive notification in case of a failure, since Power BI built alert will send us notification. From an Azure Data Factory Point of view the dataflow/dataset refresh was a successful attempt.
{
“notifyOption”: “NoNotification”
}
3.Authentication:
- Authentication Method: Select Service principal.
- Authentication Reference Method:
- Choose Inline.
- Tenant: Enter your tenant ID
- Service Principal ID: Enter your service principal (client) ID. This is your App registration client ID.
- Service Principal Credential Type: Select Service principal key.
- Service Principal Key:
- Reference the key stored in Azure Key Vault by specifying the linked service and the secret name. Use the latest secret option, to dynamically handle keys if it’s renewed.
- Resource: Set the resource to https://analysis.windows.net/powerbi/api.4.Advanced Settings (Optional):
- Retry: Set the number of retries to 0 if you do not want the activity to retry automatically on failure.
- Retry Interval: Leave as default or set a custom retry interval.
Step 3: Set Up a Web Activity for Refreshing a Power BI Dataset in Azure Data Factory
- Add a new Web Activity
Here’s how you can configure the Web Activity to refresh your Power BI dataset:
A) Set the Basic Properties:
Name: Set the name of the activity to something more descriptive, such as Refresh Power BI Dataset.
B) Settings Tab:
- URL:
- Enter the URL to trigger the dataset refresh.
- Use the expression format to ensure the URL is dynamic if needed: https://api.powerbi.com/v1.0/myorg/groups/{GroupID}/datasets/{DatasetID}/refreshes.
- Replace {GroupID} with your Workspace ID and {DatasetID} with your Dataset ID. (The Group ID corresponds to the Workspace ID, which you can find in the URL of the Power BI Service when you open your specific workspace.)
- Method:
- Set the method to POST since you are sending a request to initiate a refresh.
- Body:
- Set the body to the following JSON to avoid receiving notifications in case of failure:
{
“notifyOption”: “NoNotification”
}
C) Authentication:
- Authentication Method: Select Service principal.
- Authentication Reference Method:
- Choose Inline.
- Tenant: Enter your tenant ID.
- Service Principal ID: Enter your service principal (client) ID. This is your App registration client ID.
- Service Principal Credential Type: Select Service principal key.
- Service Principal Key:
- Reference the key stored in Azure Key Vault by specifying the linked service and the secret name. Use the latest secret option to dynamically handle keys if they are renewed.
- Resource: Set the resource to https://analysis.windows.net/powerbi/api.D) Advanced Settings (Optional):
- Retry: Set the number of retries to 0 if you do not want the activity to retry automatically on failure.
- Retry Interval: Leave as default or set a custom retry interval.
- Add Dependencies (Optional)
- Dependencies:
- Example: This dataset refresh activity might depend on the success of two previous Web Activities (Refresh Power BI Dataflow SQL and Refresh Power BI Dataflow BC). Ensure you configure these dependencies accordingly.
- Save and Trigger the Pipeline
Now that we configured to pipeline, save it and run a debug to ensure that the Power BI dataset refreshes as expected. If its successfully refreshed, then publish the changes in the Data Factory.
After publishing set an automatic trigger to your main pipeline if there isn’t one. You can do that by opening your pipeline then click on Add Trigger, then click on New/Edit. This will open a ribbon on the right side, which you can configure on your need.
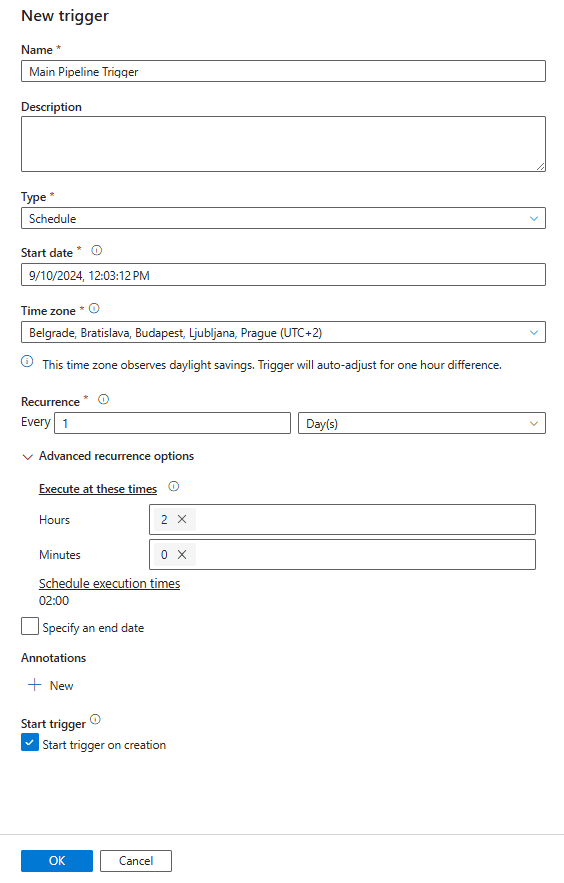
We recommend to always create a main pipeline, where you can execute all your sub pipeline at once. This will give you the ability control your whole solution through a centralized pipeline. This creates a sequence to your solution helps monitor it better. For more information, you can find the documentation here: Execute Pipeline Activity – Azure Data Factory & Azure Synapse | Microsoft Learn
Other Consideration
If you have multiple datasets that need refreshing, consider using the Get Datasets in a Group API first to retrieve the dataset IDs. You can then use the response to trigger each refresh within a single pipeline by leveraging the For Each activity in Azure Data Factory. Documentation for the API can be found here: Datasets – Get Dataset In Group – REST API (Power BI Power BI REST APIs) | Microsoft Learn and for the For Each activity can be found here: ForEach activity – Azure Data Factory & Azure Synapse | Microsoft Learn.
Summary
In this blog post, we’ve walked through the complete process of integrating Azure Data Factory (ADF) with Power BI to automate the refresh of datasets and dataflows, ensuring your reports are always up to date. Here’s a recap of the key steps:
- Setup and Preparation: We started by configuring essential components such as App Registrations, security groups, and Azure Key Vault to securely manage access and credentials.
- Enabling APIs and Permissions: We enabled the necessary Fabric API in the Power BI Admin Portal for a specific security group, ensuring that only authorized applications can trigger dataset and dataflow refreshes.
- Creating Linked Services in ADF: We created linked services in Azure Data Factory to securely connect to Azure Key Vault, allowing us to store and retrieve sensitive credentials like client secrets.
- Building the Pipeline: With everything in place, we built the ADF pipeline, adding Web Activities to trigger the refresh of Power BI dataflows and datasets using the Power BI REST API. We also covered how to handle multiple datasets by using the Get Datasets in a Group API and the For Each activity in ADF.
By following these steps, you can automate the data refresh process in Power BI, ensuring that your business intelligence insights are based on the most current data. This integration not only streamlines your workflow but also enhances the security and manageability of your data processes.
Whether you’re working with a single dataset or multiple dataflows, Azure Data Factory provides a robust platform for orchestrating your data integration and refresh needs.
————————————————————————————————————————————————————————————–
Microsoft Documentations
Power BI REST APIs for embedded analytics and automation – Power BI REST API | Microsoft Learn
Dataflows – Refresh Dataflow – REST API (Power BI Power BI REST APIs) | Microsoft Learn
Datasets – Refresh Dataset – REST API (Power BI Power BI REST APIs) | Microsoft Learn
What is Azure Key Vault? | Microsoft Learn
Authentication and authorization basics – Microsoft Graph | Microsoft Learn
Introduction to Azure Data Factory – Azure Data Factory | Microsoft Learn
Blog posts

How to structure your context layer Fabric IQ and Foundry IQ
Heading 1
Heading 2
Heading 3
Heading 4
Heading 5
Heading 6
Lorem ipsum dolor sit amet, consectetur adipiscing elit, sed do eiusmod tempor incididunt ut labore et dolore magna aliqua. Ut enim ad minim veniam, quis nostrud exercitation ullamco laboris nisi ut aliquip ex ea commodo consequat. Duis aute irure dolor in reprehenderit in voluptate velit esse cillum dolore eu fugiat nulla pariatur.
Block quote
Ordered list
- Item 1
- Item 2
- Item 3
Unordered list
- Item A
- Item B
- Item C
Bold text
Emphasis
Superscript
Subscript
How to build custom AI agents with Copilot Studio
Heading 1
Heading 2
Heading 3
Heading 4
Heading 5
Heading 6
Lorem ipsum dolor sit amet, consectetur adipiscing elit, sed do eiusmod tempor incididunt ut labore et dolore magna aliqua. Ut enim ad minim veniam, quis nostrud exercitation ullamco laboris nisi ut aliquip ex ea commodo consequat. Duis aute irure dolor in reprehenderit in voluptate velit esse cillum dolore eu fugiat nulla pariatur.
Block quote
Ordered list
- Item 1
- Item 2
- Item 3
Unordered list
- Item A
- Item B
- Item C
Bold text
Emphasis
Superscript
Subscript
Ready to talk about your use cases?
Request your free audit by filling out this form. Our team will get back to you to discuss how we can support you.
