Hiding Subgrid Buttons Specifically

Zsombor Szénasi

Depending on the stage of a sales process, different functions should be available on a form's Subgrid. Practically, this means that at the beginning of the process, interests can be added to a Lead, but these should not be modifiable later in the Opportunity phase.This article requires some technical knowledge for understanding and application, so it is recommended for Dynamics 365 CE app makers who are already familiar with the Power Platform world.
Starting point:
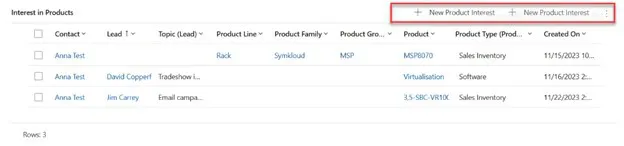
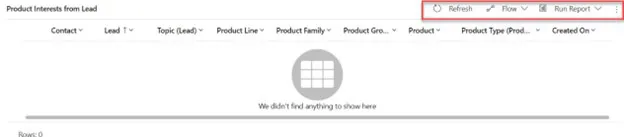
Goal:
Tools Used for the Solution:
- JavaScript (Recommended: XRM toolbox – Web Resource Manager) - WebResources Manager · XrmToolBox
- Ribbon Workbench - Develop 1 Ltd | Ribbon Workbench for Dynamics 365 & Dynamics CRM
The Solution:
1. Solution
Create a Solution that will be loaded into the Ribbon Workbench. Add the entity whose SubGrid you want to modify into this solution. (Important: when adding the existing entity to the Solution, do not import any other elements). The name of the Solution should always be constructed based on the following logic: Ribbon_VL_[entity name] e.g., Ribbon_VL_Product_Interest.

2. Subgrid
Name the SubGrid with a unique, identifiable name. Do not use the automatically generated name, as you will refer to this later.
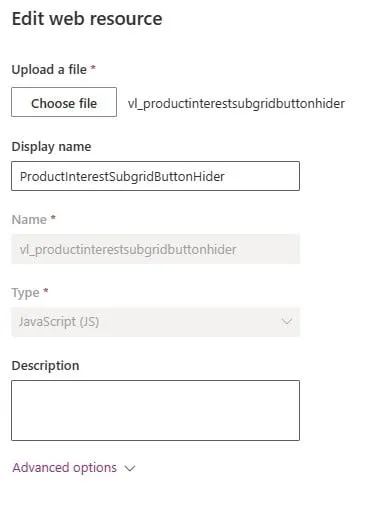
3. JavaScript
Create the following JavaScript as a .js file (using VS Code), then upload it to the solution containing the Web resources. It is advisable to name the file the same as its content to make it easier to find later.
forProductInterestView: function (selectedControl) {console.log("start.forProductInterestView");"use strict";debugger;var currentGridName = selectedControl._controlName;console.log("forProductInterestView-currentGridName: "+currentGridName);var excludedPayRun = "subgrid_prodinterest"; //Name of the subgridif (currentGridName == excludedPayRun) {console.log("end.forProductInterestView.true");return false;}else { console.log("end.forProductInterestView.false");return true; }}
4. Ribbon Workbench
Open the Ribbon workbench and add the solution created in step one. Each entity has 3 ribbons: Home, Subgrid, Form. We now need the Subgrid.
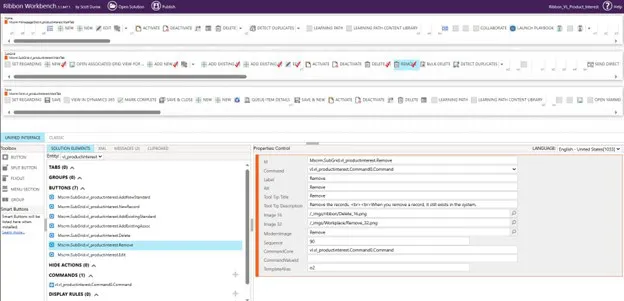
Select the button you want to remove by right-clicking on it and pressing "Customise Button." A red checkmark will appear, and it will also be added to the Buttons section below. If it is already checked, it means a command is already associated with it; in that case, you need to add a new command and can skip this step.
Next, add a Command, which can be done by clicking the plus sign in the Commands section. The command should look like this:
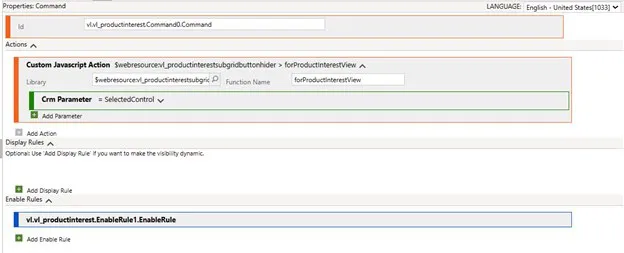
Explanation:
- Library: The webResource you added to the solution (this is where the good naming comes in)
- Function name: The name given in the JavaScript. (The part before the Function)
- CRM Parameter: What parameter to pass; in this case, it is the SelectedControl. This Control manages the SubGrids on Forms and all listings. The PrimaryControl manages the form.
Next, add an EnableRule that hides the buttons.
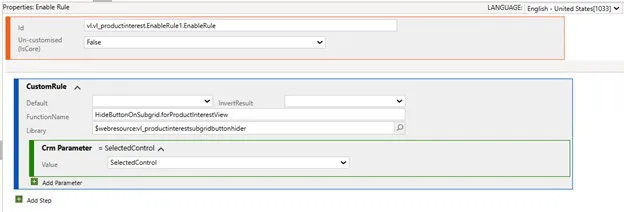
Explanation:
- Library: The webResource you added to the solution (this is where the good naming comes in)
- Function name: The name given in the JavaScript. (The part before the Function)
- CRM Parameter: What parameter to pass; in this case, it is the SelectedControl
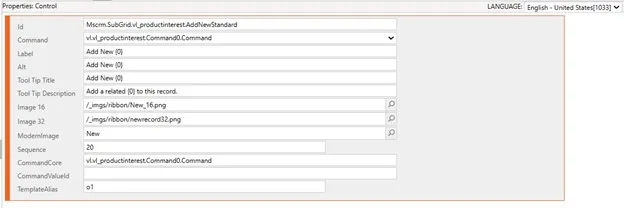
Only one step remains before Publishing. For the buttons, specify which Command should be associated with them.
I hope you find this article useful and that it provides a solution idea.
Blog posts
There's a new way to turn business ideas into app frameworks
Heading 1
Heading 2
Heading 3
Heading 4
Heading 5
Heading 6
Lorem ipsum dolor sit amet, consectetur adipiscing elit, sed do eiusmod tempor incididunt ut labore et dolore magna aliqua. Ut enim ad minim veniam, quis nostrud exercitation ullamco laboris nisi ut aliquip ex ea commodo consequat. Duis aute irure dolor in reprehenderit in voluptate velit esse cillum dolore eu fugiat nulla pariatur.
Block quote
Ordered list
- Item 1
- Item 2
- Item 3
Unordered list
- Item A
- Item B
- Item C
Bold text
Emphasis
Superscript
Subscript

How to Set Your Local Currency as the Default in Dynamics 365
Heading 1
Heading 2
Heading 3
Heading 4
Heading 5
Heading 6
Lorem ipsum dolor sit amet, consectetur adipiscing elit, sed do eiusmod tempor incididunt ut labore et dolore magna aliqua. Ut enim ad minim veniam, quis nostrud exercitation ullamco laboris nisi ut aliquip ex ea commodo consequat. Duis aute irure dolor in reprehenderit in voluptate velit esse cillum dolore eu fugiat nulla pariatur.
Block quote
Ordered list
- Item 1
- Item 2
- Item 3
Unordered list
- Item A
- Item B
- Item C
Bold text
Emphasis
Superscript
Subscript
Ready to talk about your use cases?
Request your free audit by filling out this form. Our team will get back to you to discuss how we can support you.
